Setting Up the Infrastructure
- date:
2020-07-23
Summary
Follow this topic to set up the infrastructure for OpenSDN deployment with RHOSP 16.1.
Target Configuration (Example)
Undercloud and overcloud KVM hosts require virtual switches and virtual machine definitions to be configured. You can deploy any KVM host operating system version that supports KVM and OVS. The following example shows a RHEL/CentOS based system. If you are using RHEL, you must subscribe the system.
The following example illustrates all control plane functions as Virtual Machines hosted on KVM hosts.
There are different ways to create the infrastructure providing the control plane elements. To illustrate the installation procedure, we will use four host machines for the infrastructure, each running KVM. KVM1 contains a VM running the undercloud while KVM2 through KVM4 each contains a VM running an OpenStack controller and a OpenSDN controller.
Table 1: Control Plane Infrastructure
KVM Host |
Virtual Machines |
|---|---|
KVM1 |
undercloud |
KVM2 |
OpenStack Controller 1, OpenSDN Controller 1 |
KVM3 |
OpenStack Controller 2, OpenSDN Controller 2 |
KVM4 |
OpenStack Controller 3, OpenSDN Controller 3 |
Figure 1 shows the physical connectivity where each KVM host and each compute node has two interfaces that connect to an external switch. These interfaces attach to separate virtual bridges within the VM, allowing for two physically separate networks (external and provisioning networks).
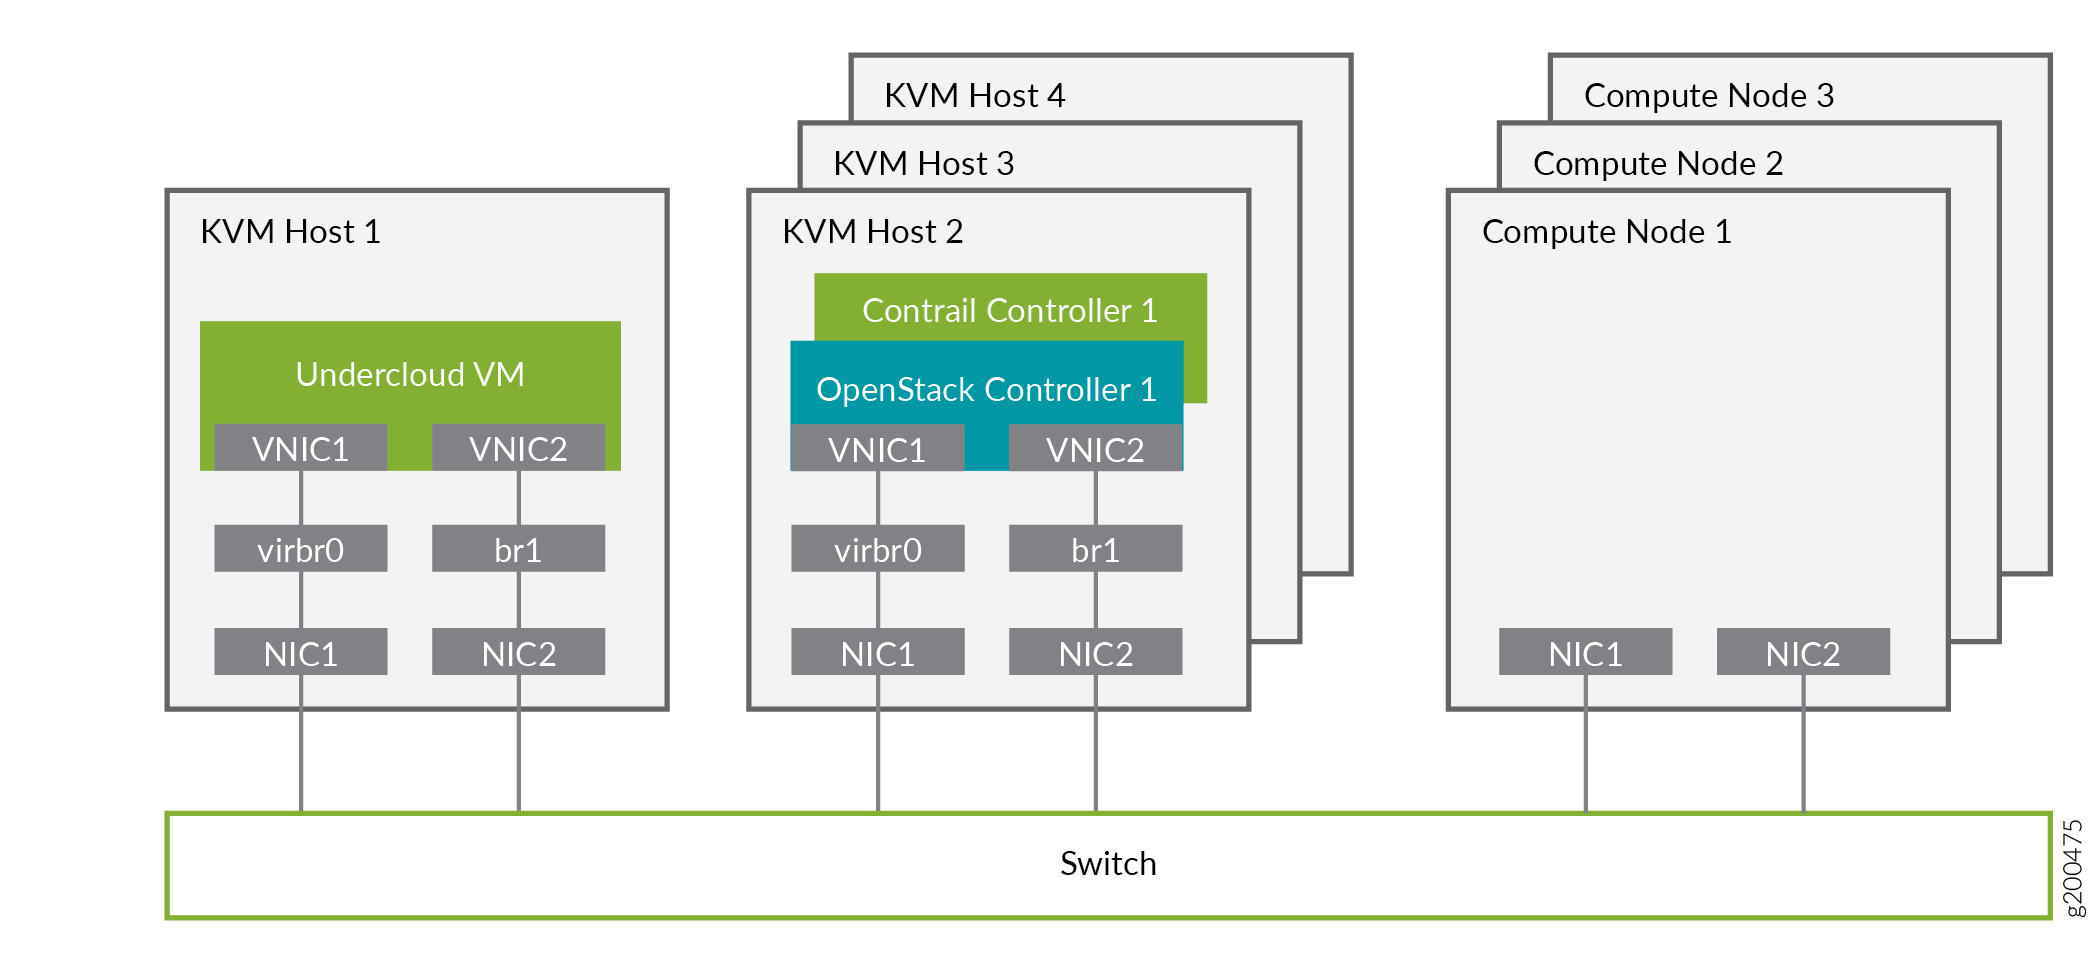
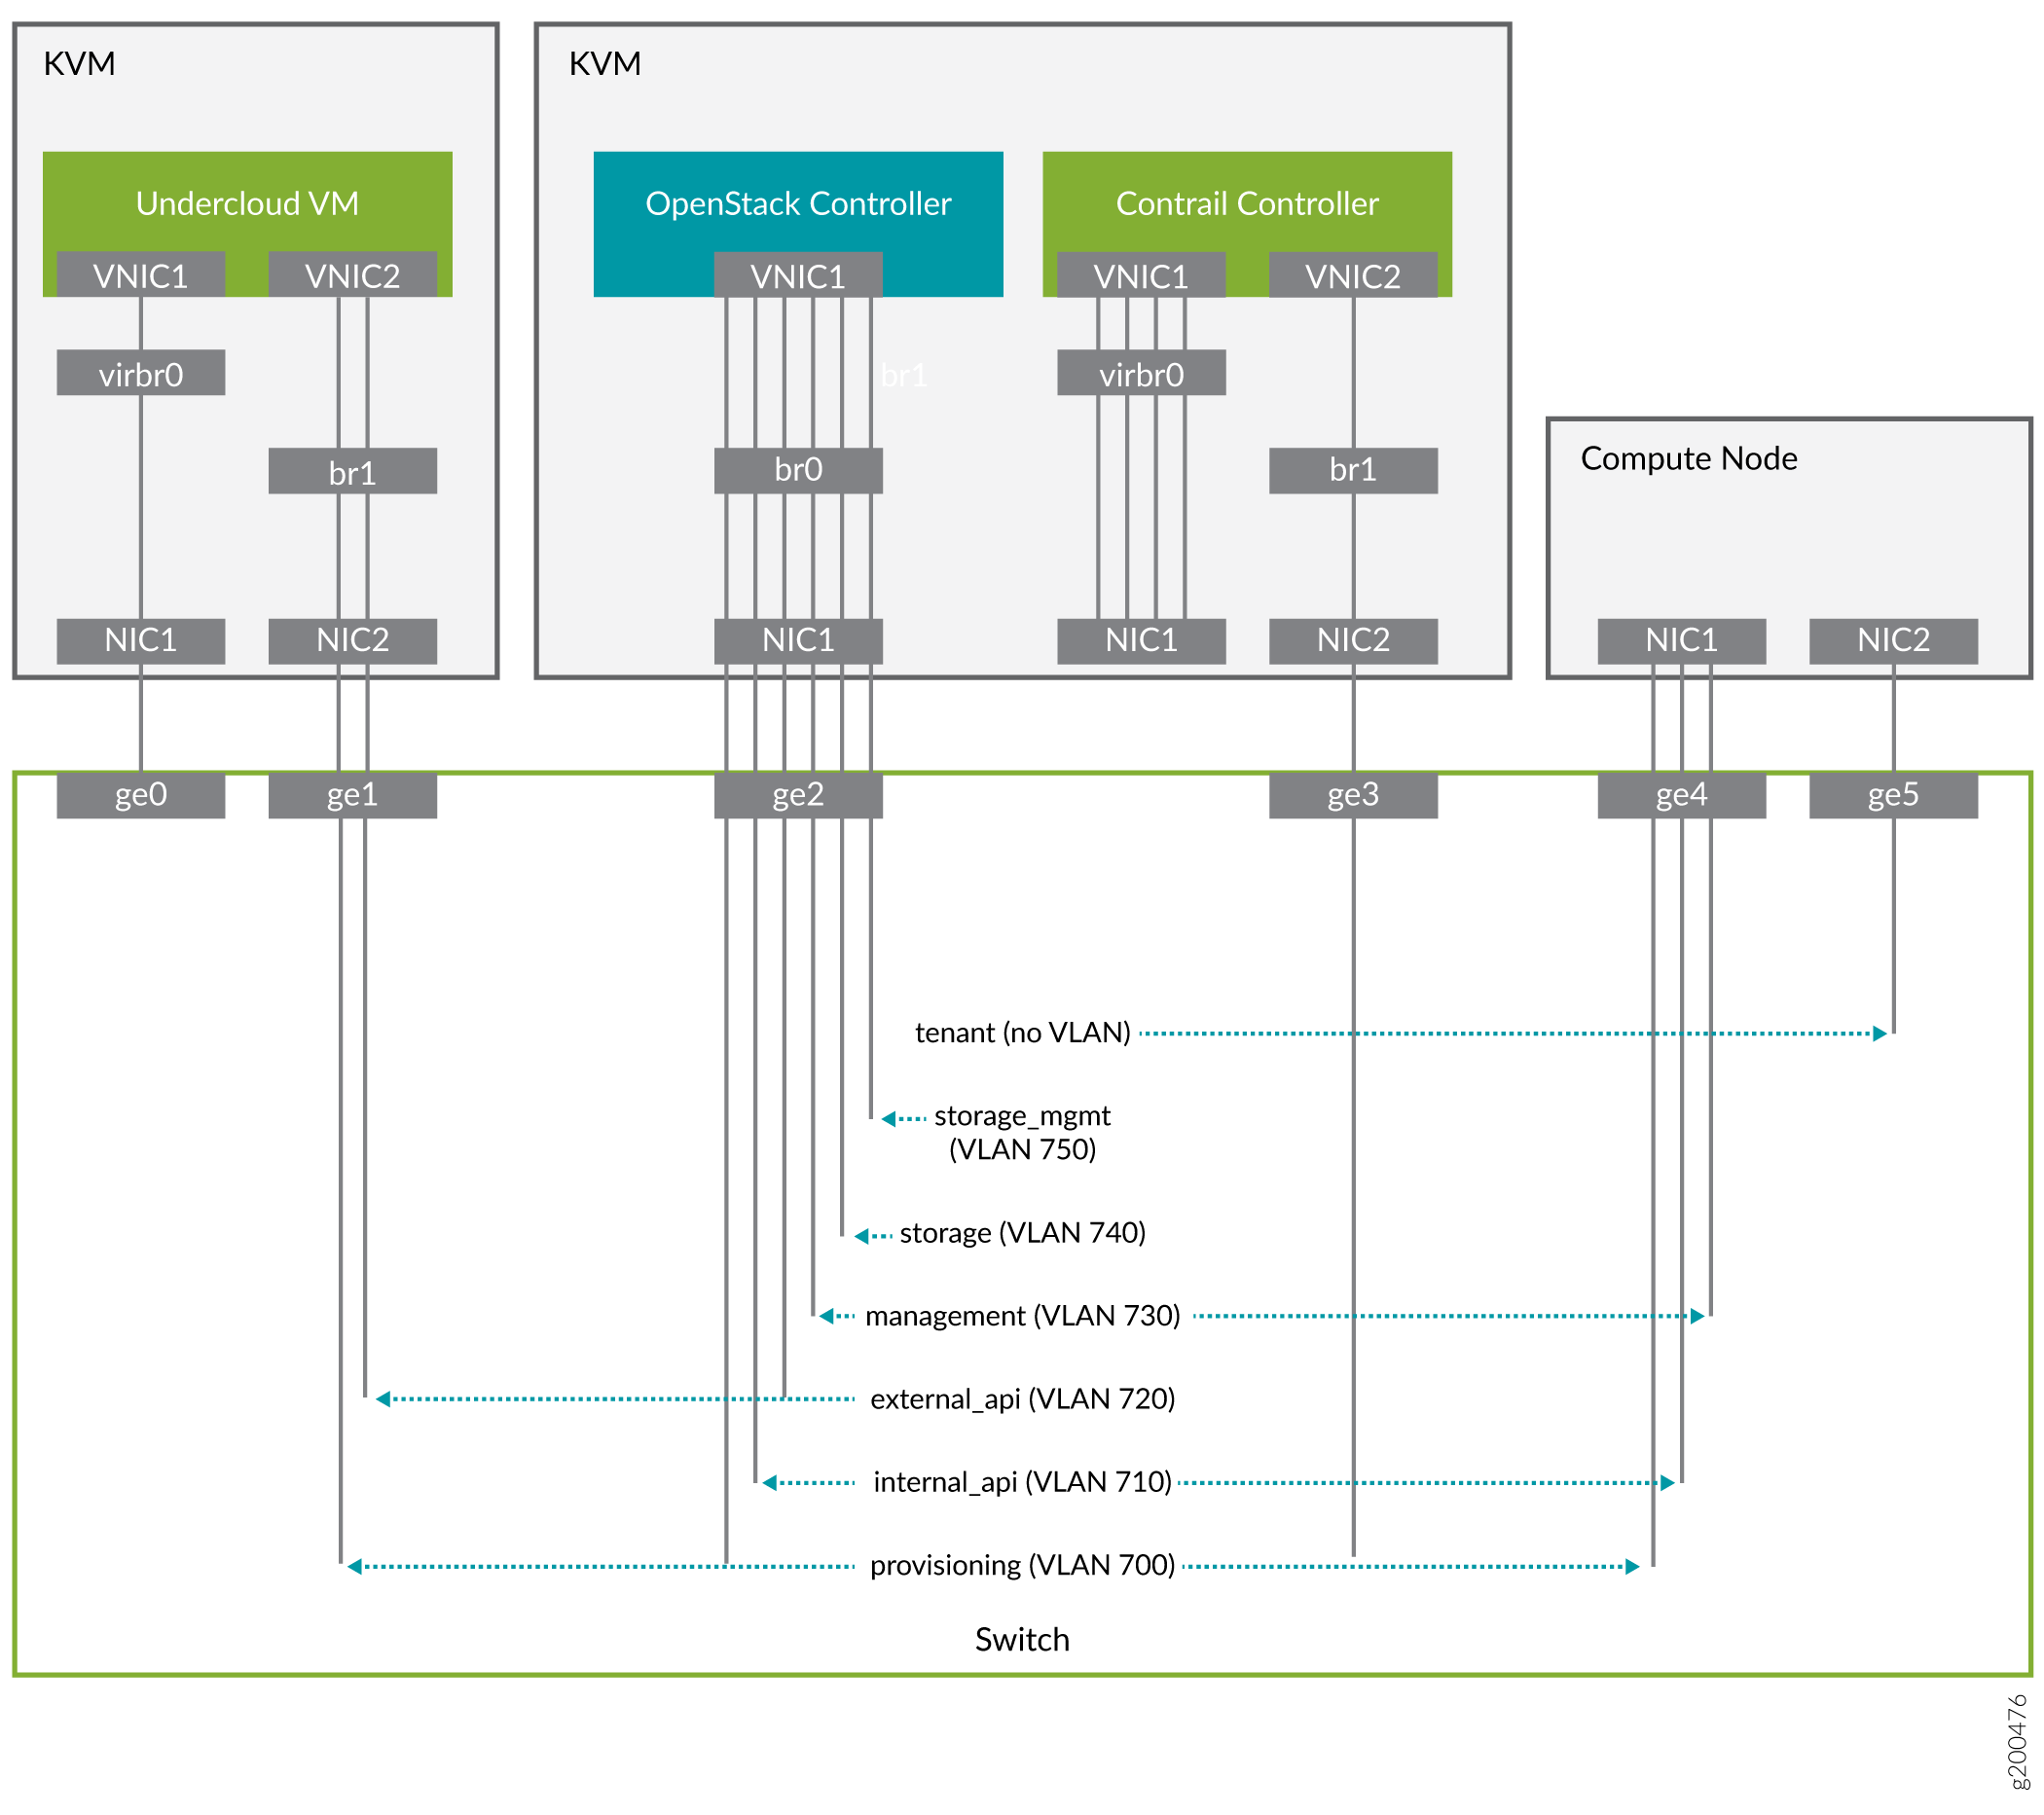
Figure 2 shows the logical view of the connectivity where VLANs are used to provide further network separation for the different OpenStack network types.
The following sections describe how to configure the infrastructure, the undercloud, and finally the overcloud.
Configure the External Physical Switch
Configure the ports and VLANs on the external physical switch according to the following table:
Table 2: External Physical Switch Port and VLAN Configuration
Port |
Trunked VLAN |
Native VLAN |
|---|---|---|
ge0 |
||
ge1 |
700, 720 |
|
ge2 |
700, 710, 720, 730, 740, 750 |
|
ge3 |
||
ge4 |
710, 730 |
700 |
ge5 |
Configure KVM Hosts
Use this example procedure to install the required packages and start KVM and Open vSwitch on each undercloud and overcloud KVM host.
Log in to a KVM host.
Install the required packages.
yum install -y libguestfs \
   libguestfs-tools \
   openvswitch \
   virt-install \
   kvm libvirt \
   libvirt-python \
   python-virtualbmc \
   python-virtinst
Start KVM and Open vSwitch.
systemctl start libvirtd
systemctl start openvswitch
Additionally, on the overcloud nodes only, create and start the virtual switches br0 and br1.
Table 3: vSwitch Configuration
Bridge
Trunked VLAN
Native VLAN
br0
710, 720, 730 740, 750
700
br1
# Create the virtual switches and bind them to the respective interfaces.
ovs-vsctl add-br br0
ovs-vsctl add-br br1
ovs-vsctl add-port br0 NIC1
ovs-vsctl add-port br1 NIC2


# Create the configuration file for br0.
cat << EOF > br0.xml
<network>
   <name>br0</name>
   <forward mode='bridge'/>
   <bridge name='br0'/>
   <virtualport type='openvswitch'/>
   <portgroup name='overcloud'/>
      <vlan trunk='yes'>
         <tag id='700' nativeMode='untagged'/>
         <tag id='710'/>
         <tag id='720'/>
         <tag id='730'/>
         <tag id='740'/>
         <tag id='750'/>
      </vlan>
   </portgroup>
</network>
EOF


# Create the configuration file for br1.
cat << EOF > br1.xml
<network>
   <name>br1</name>
   <forward mode=’bridge’/>
   <bridge name='br1'/>
   <virtualport type='openvswitch'/>
</network>
EOF


# Create the br0 network based on the configuration file.
virsh net-define br0.xml
virsh net-start br0
virsh net-autostart br0


# Create the br1 network based on the configuration file.
virsh net-define br1.xml
virsh net-start br1
virsh net-autostart br1
Repeat step 1 through step 4 for each KVM host.
Create the Overcloud VM Definitions on the Overcloud KVM Hosts
Use this example procedure on each overcloud KVM host (KVM2 to KVM4) to do the following:
create the VM definitions for that overcloud KVM host
create and start a virtual baseboard management controller for that overcloud KVM host so that the VM can be managed using IPMI
create an
ironic_listfile to be used by the undercloud
This example procedure creates a VM definition consisting of 2 compute nodes, 1 OpenSDN controller node, and 1 OpenStack controller node on each overcloud KVM host.
Log in to an overcloud KVM host.
Specify the roles you want to create.
ROLES=compute:2,contrail-controller:1,control:1
Create the VM definitions.
# Initialize and specify the IPMI user and password you want to use.
num=0
ipmi_user=<user>
ipmi_password=<password>
libvirt_path=/var/lib/libvirt/images
port_group=overcloud
prov_switch=br0
/bin/rm ironic_list


# For each role and instance specified in the ROLES variable:
#    - create the VM definition
#    - create and start a virtual baseboard management controller (vbmc)
#    - store the VM information into an ironic_list file (for later use in the undercloud)
IFS=',' read -ra role_list <<< "${ROLES}"
for role in ${role_list[@]}; do
   role_name=`echo $role|cut -d ":" -f 1`
   role_count=`echo $role|cut -d ":" -f 2`
   for count in `seq 1 ${role_count}`; do
      echo $role_name $count
      qemu-img create -f qcow2 ${libvirt_path}/${role_name}_${count}.qcow2 99G
      virsh define /dev/stdin <<EOF
      $(virt-install --name ${role_name}_${count} \
         --disk ${libvirt_path}/${role_name}_${count}.qcow2 \
         --vcpus=4 \
         --ram=16348 \
         --network network=br0,model=virtio,portgroup=${port_group} \
         --network network=br1,model=virtio \
         --virt-type kvm \
         --cpu host \
         --import \
         --os-variant rhel8.2 \
         --serial pty \
         --console pty,target_type=virtio \
         --graphics vnc \
         --print-xml)
EOF
      vbmc add ${role_name}_${count} --port 1623${num} --username ${ipmi_user} --password ${ipmi_password}
      vbmc start ${role_name}_${count}
      prov_mac=`virsh domiflist ${role_name}_${count}|grep ${prov_switch}|awk '{print $5}'`
      vm_name=${role_name}-${count}-`hostname -s`
      kvm_ip=`ip route get 1  |grep src |awk '{print $7}'`
      echo ${prov_mac} ${vm_name} ${kvm_ip} ${role_name} 1623${num}>> ironic_list
      num=$(expr $num + 1)
   done
done
Repeat step 1 through step 3 on each overcloud KVM host.
Caution
This procedure creates one ironic_list file per overcloud KVM host.
Combine the contents of each file into a single ironic_list file on
the undercloud.
The following shows the resulting ironic_list file after you combine
the contents from each separate file:
Create the Undercloud VM Definition on the Undercloud KVM Host
Use this example procedure on the undercloud KVM host (KVM1) to create the undercloud VM definition and to start the undercloud VM.
Create the images directory.
mkdir ~/images
cd images
Retrieve the image.
RHEL
Download rhel-server-8.2-update-1-x86_64-kvm.qcow2 from RedHat portal to ~/images.
cloud_image=~/images/rhel-server-8.2-update-1-x86_64-kvm.qcow2
Customize the undercloud image.
undercloud_name=queensa
undercloud_suffix=local
root_password=<password>
stack_password=<password>
export LIBGUESTFS_BACKEND=direct
qemu-img create -f qcow2 /var/lib/libvirt/images/${undercloud_name}.qcow2 100G
virt-resize --expand /dev/sda1 ${cloud_image} /var/lib/libvirt/images/${undercloud_name}.qcow2
virt-customize  -a /var/lib/libvirt/images/${undercloud_name}.qcow2 \
--run-command 'xfs_growfs /' \
--root-password password:${root_password} \
--hostname ${undercloud_name}.${undercloud_suffix} \
--run-command 'useradd stack' \
--password stack:password:${stack_password} \
--run-command 'echo "stack ALL=(root) NOPASSWD:ALL" | tee -a /etc/sudoers.d/stack' \
--chmod 0440:/etc/sudoers.d/stack \
--run-command 'sed -i "s/PasswordAuthentication no/PasswordAuthentication yes/g" /etc/ssh/sshd_config' \
--run-command 'systemctl enable sshd' \
--run-command 'yum remove -y cloud-init' \
--selinux-relabel
Note
As part of the undercloud definition, a user called stack is created. This user will be used later to install the undercloud.
Define the undercloud virsh template.
vcpus=8
vram=32000
virt-install --name ${undercloud_name} \
--disk /var/lib/libvirt/images/${undercloud_name}.qcow2 \
--vcpus=${vcpus} \
--ram=${vram} \
--network network=default,model=virtio \
--network network=br0,model=virtio,portgroup=overcloud \
--virt-type kvm \
--import \
--os-variant rhel8.2 \
--graphics vnc \
--serial pty \
--noautoconsole \
--console pty,target_type=virtio
Start the undercloud VM.
virsh start ${undercloud_name}Retrieve the undercloud IP address. It might take several seconds before the IP address is available.
undercloud_ip=`virsh domifaddr ${undercloud_name} |grep ipv4 |awk '{print $4}' |awk -F"/" '{print $1}'` ssh-copy-id ${undercloud_ip}